12/24/17

Day #12 of my 12 Day of Christmas Crafts- setting up a casual buffet


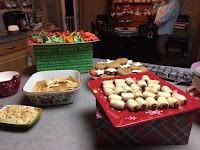
I have some wrapped empty boxes I use for decoration on my stairs each year. I also use these boxes to add height and depth to my holiday buffet. I plan out and place all pieces so they are accessible from all sides of my kitchen island. I throw in some holiday dishes and its a quick and easy good looking buffet set up. You can use bows (on the sides of boxes only due to hot plates possibly burning) but, this year I kept it simple and just green and reds. 

I staggered all different heights and shaped dishes throughout to give a contrast and make mor eye appealing. Simple finger foods so easy to reach. My menu consisted of pigs in a blanket, ham and swiss sliders, vegetables and bacon/ cheddar dip, hummus and pita chips, spinach and artichoke dip, cranberry jalapeno chicken meatballs, cocktail mushrooms,  holiday popcorn, whiskey pretzels, a large meat/ cheese tray, cookies and brownies. 


Don't pay attention to the partially burnt slider sandwiches-ugh! The last couple times I have made them the tops have got dark. I haven't used a recipe for the win years but I am thinking putting them in with other items in an oven temp of above 350 F is too high and causes this to happen. Oh well, they were edible and my family ate the left overs this morning. 


Thanks for stopping by... Merry Christmas! 


Several years ago I got one of these buffet slow cooker set ups. I love this thing! I just kept this on my ceramic top stove ( across from my island buffet) and had the hot foods in this all evening. 


12/23/17

Day #11 of my 12 Days of Christmas Crafts- goody bag gifts


I always give those that attend my annual cookie exchange a little gift. This year I wrapped all in a small bag and made a simple tag using a Santa stamp I have had for years. These took little time at all. I colored the tags while watching The Sound of Music the other night on TV. 
I collect or make things throughout the year and fill with simple and personal items. Just a little trinket of my appreciation. 


Day #10 of my 12 Days of Christmas Crafts- baking

I have hosted a cookie/ cocktail exchange party for the last several years on the Friday before Christmas. I invite some of my favorite ladies into my home and we have a wonderful time talking, laughing, playing games, taking selfies, swapping cookies and recipes, and sharing cocktails. 
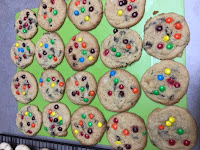
I am doing my last minute baking (the morning of) to get ready. Wow! its a lot of work to get ready for a holiday party. I baked the chocolate shortbread drops for the swap and plated some pumpkin chocolate chips with pretzels and some chocolate covered brownies for the party later on. I had to incorporate my family's favorite- chocolate chip with M&Ms into my baking today or I would have had some very disappointed people. 


12/21/17

Day #9 of my 12 Days of Christmas Crafts- Cards

Tis' the season for sending cards. Yes, I still send Christmas cards. I find it so sad that this is almost a thing of the past. I enjoy making and getting handmade cards and I know  people that feel the same. 

All the cards I made this year use Stampin' Up! stamps and inks. I combined various papers and card stock brands. I like to stick to the traditional red/ green color combinations for most of my Christmas decor and cards- its just my preference. 

The older I get the less time I spend making the cards but, I feel they are still special and unique. I love that Stampin' Up! makes products like stamps, papers, ribbon, inks, and punches that all coordinate and take the search time out of the creation time. 

Merry Christmas!!!!!!


12/20/17

Day #8 of my 12 Days of Christmas Crafts- jewelry

Ok, here are a couple quick and easy jewelry crafts. I am almost embarrassed how simple. I love that crafts stores make these things so easy... 
Bought the faux leather band and charms at Hobby Lobby. 

I added a pre-made tassel and hooked the Christmas charm onto the bracelet. 

Viola,  jewery #1 complete! 

Again, I purchased these items at Hobby Lobby. I attached the adorable  christmas tree glass charms to a brassy chain using o- ring. 

Viola, jewelry #2 complete! 


Now for jewelry #3- i used my jewelry tools to cut a 60" chain in half. 

using my jeweler tools again, I attached a lobster clasp to the end,  and  an o-ring for pendant to hand from. 


I found this awesome 2-sided rectangular pendant at Hobby Lobby and attached to the newly made chain. Another simple but adorable Christmas craft. 


12/19/17

Day #7 of my 12 Days of Christmas Crafts- Christmas Dinner Floral Centerpiece

Ok, This craft was so easy... I bought this old metal carrier years ago but never knew what to put in it.    I decided to use wide mouth jelly mason jars to give it that Country-chic look. 


I bought 2 already made Christmas bouquets at Michael's Craft store for 50% a couple weeks ago. I trimmed the length down about 2" using wire snips. Placed them inside each jar and added a sprig of icy branches to each bouquet. 

I chalked a metal hanging chalkboard tag that I found at Target using a mistletoe transfer and white chalk from CHALK COUTURE. I added 2 foam candy cane stickers to the tag to finish it off. Tied the tag to the metal basket using striped bakers twine. 


Simply beautiful... 


12/18/17

Day #6 of my 12 Days of Christmas Crafts- Chalk Couture Holiday Reindeer Chalkboard

This is a fun multi-step crafting project. Making a wreath and using Chalk Couture chalks and transfers. So fun and so pretty when its all done. I love Chalk Couture... If you want to learn more or to purchase items like I have used visit the link above. 
Used straight pins to secure your ribbon before you start wrapping. If you want this wreath to be more permanent, you can hot glue instead of pinning. 


 Using a 12" foam wreath form, wrap 3 yards of 2" or larger width (I used 2.5") decorative ribbon of your choice around the form.  Once form is completely wrapped, secure again using straight pins ( temporary) or hot glue ( permanent). 
Using 1.5 yards of 1" wide or larger ( I used 1.5") wire-edged ribbon start to make bow to your liking ( I doubled mine) and ends to the length you desire. 

Using straight pins to secure and hold your bow into place one layer at a time. 
I hid straight pins under center portion. Use hot glue if you want this bow to be permanent. 


I thin the wreath is pretty just like this. 
Contemporary yet whimsical!

Ok, here we go... the fun chalking part to further coordinate and decorate your home. Use the evergreen chalk paste and evergreen bough chalk transfer in both top corners. 

I used the cream chalk paste and just part of this large Christmas transfer for a small verse at the bottom of the board. 

spread cream chalk paste on only the parts you want, squeegee excess and put back into chalk container to use again, and peel sticky backed transfer from chalkboard surface. Rinsed or soak the transfer in warm water in a sink immediately. You don't want chalks to dry on your transfers or they will be ruined. 

Here is the look so far... pretty like this but, I wanted more...

I added some red berries on top of the green pine boughs after about 10 minutes of dry time. Once again, pretty like this but, I wanted more again... 

Using a white liquid chalk marker, I added white light reflection to each red berry for further texture and detail. 
*NOTE- when doing this you want to mark the same side/ angle of each item as if the light is shining consistently on that item. You don't want to randomly mark each berry as if light is shining from various directions*

I used a large magnetic hook (sold online at CHALK COUTURE) to hold both the foam wreath and paper mache reindeer head onto magnetic Chalk Couture chalkboard. 

So simple and pleasing. I am in love with this!!!!!
Thanks for stopping by.