8/2/18

Tuna Macaroni Salad

Hello bloggers. Its been a while since I have posted and especially since I have posted a recipe. It is hard to keep up with everyday tasks, work, and just life. It definitely gets in the way and often throws wrenches in plans, ideas, and their execution. With being home in the summer you would think I would have more time- nope. It feels like just the opposite. Time has just flown by. Now I am getting ready for a new school year to start. With that being said, I thought I would share a quick, easy, refreshing, and delicious recipe that can be made now or as your busy school year starts. Its keeps in the fridge up to 5 days  (it will probably be eaten before that). 
This recipe was recently shared with me by a friend and it is yummy. She has been making this recipe for 25+ years and got this recipe from her friend's mother in the 80s. From what I know, its a 1950s- 1960s recipe. When I heard the ingredients I didn't think this sounded appetizing at all.  Woah... was I wrong. Its very tasty and a delicious cold salad to eat as is or over a bed of lettuce. Its perfect as a side or main dish. It travels well. I actually am taking it with me on a weekend lake trip. My family requested this as lunch a couple days. 
Lets get started...

Boil 1lb box of elbow pasta according to directions in salted water. Strain, and rinse with cold water to stop cooking process. Add to large bowl. 

Add one 15oz can (including juice), one 11 oz can of peas (drained),  two cans of tuna (drained), and 1/2-1 Cup mayo (to your taste and calorie preference). Mix all together. 

Variation option: add 1/2 diced green pepper and or 1 stalk diced celery to add crunch. 

Add salt and pepper to taste. Chill in fridge for 1 hour before serving. Stir everytime before serving. 

2/8/18

VINTAGE Inspired Monogram Bracelet

I made this for a friend for her birthday. I loved the look of the mixed beads and items for the bracelet and thought these monogram charms were perfect. 

I hope she loves it as much as I do. 

I found all the times at Hobby Lobby. They make crafting so simple.
 Love that store!!!!!

2/5/18

JEWELRY- CUFF BRACELET

 I scored 'big' at Hobby Lobby this past weekend when I came across this cuff for less than $2 and the adorable metal plate for less than $1.  So simple and adorable. I am almost embarrassed to admit I made it... kinda. 


Valentine Card Swap- 2018

                                            
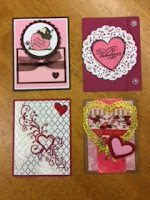
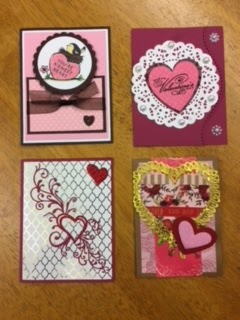
Here are a few of the Valentine Card Swap cards I received. I started hosting a themed card swap in my home (late 2017) every 6-8 wks. 5-8 lovely local women attend and I provide a soup/ salad lunch and a make-n-take craft project. We enjoy the fellowship, sharing ideas, and laughter. The plan is to have a full box of various handmade cards by the end of the year.  So far so good, My box is actually 1/2 filled already. 


2/3/18

CELLO GOODY BAGS- HEARTINI STAMPIN' UP!

I am using up some SU! products pieces I have had sitting in a storage box in my craft studio. I love the way these adorable long skinny ( non traditional size) cello bags turn out. They are perfect for  a little paper shreds and a nail polish along with a rolled gift certificate for bridesmaids for a wedding. Maybe just the nail polish and a nail file for a simple bachelorette party gift.  

I stamped the heartini martini  from the Making Spirits Bright SU set onto whisper white and cut out. Glued to the foil edge heart. 

I colored the heartini image using 2 shades of pink and added a dimensional heart sticker to fit perfectly on the heart. 

2/1/18

VALENTINE CELLO GOODY BAGS- STAMPIN' UP!

Available for sale on my Easy store are these adorable mini cello bags and tags. 


Set of 6 tags, cello bags, and red striped twine


visit my papercutiesworkshop on Etsy for these or more of my handmade items. 
Thanks for stopping by. 


1/30/18

LAYERED HEARTS VALENTINE CARD

Here is another card made for my Valentine Card swap.  
I cased it from Keisha Campbell at abiteast.typepad.com.
 I love her use of color and style. 

1/28/18

PARTY PANDAS STAMPIN' UP!- Valentine card

I made a quick, easy, and adorable 3"x3" 
Valentine card using the Sale-A-Bration 'Party Pandas' 
set from STAMPIN' UP! 
I just love how this turned out. 
I am using this in an upcoming Valentine card swap. 
I hope the ladies will love it as much as I do. 


1/26/18

STAMPIN' UP! HEDGEHUGS- VALENTINE


I found these cute heart shaped cards and envelopes at JoAnn's (Miss Sparkle Line) for $1.99. I knew I wanted to add either my new  hedgehogs or pandas to them. I went for the adorable hedgehogs and I am so happy with the way they turned out. I added black and white polkadot wash tape to the heart card front. Wrapped some pink vintage twine and attached with glue dot. I stamped the hedgehog image in black and then punched out with 2" circle punch. I attached the hedgehog with dimensional and added adorable puffy heart stickers to his chest and to the flower.  

Simple. Adorable. Fun. 
If interested in purchasing this adorable set you can place an order here: 

1/24/18

VALENTINE PHOTO BOARD- UPCYCLED

I found this weekly organizer  board at Hobby Lobby for less than $5  way before Christmas. I have been trying to figure out what to do with it. Finally,  as I was taking down my Christmas stuff and  decorating for Valentine's I decided to cover the letters up with heart stickers from the Dollar Tree, add a curly ribbon left over form Christmas decor, and add some of my recently developed photos. 

I love how it turned out! 
Total cost of this bargain project is $6 
(not including photo development). 
Another simple, cute, inexpensive decoration. 

1/22/18

STAMPIN' UP! VALENTINE GOODY BAG- MAKE AND TAKE PROJECT

I am hosting a Valentine card swap  and made these adorable goody bags using up some of my older SU! items paired with new pink doilies and mini clothes pins from JoAnn's. 

each bag will hold a fun size M&M packet. Simple. Adorable. Fun. 

1/21/18

CHALK COUTURE SHADOW BOX CLUB- VALENTINE

Here is another CHALK COUTURE  shadow box club project. My shadow box club started last month. Everyone completed an adorable Christmas themed box. Those attending this month will bring their emptied shadow boxes and complete the lovely Valentine themed one. I will have 5-6 club meetings in 2018 which will provide the attendees with 5-6 holidays decorations to have for the following years. 

This shadow box club will get: all contents of the inside i.e: decorative paper, paper doily hearts, pom-pom garland, string of heart lights, a valentine scarf, felt snowflake, and felt hearts. Each attendee will also get a red or pink chalk paste, 1/2 small squeegee, and a 'love' transfer stencil. 
If you are interested in learning more about CHALK COUTURE visit my page or their official site. If you are a decorator like me, you will fall in love with these products and the endless possibilities.  

1/19/18

VALENTINE ACCENT PILLOWS

I decided to reuse my Christmas stripe pillows for Valentine's decor. I simply added a paper doily heart and a polkadot decorative 3" wide ribbon for an adorable touch. I have them sitting on side chairs on both sides of my kitchen hutch. 


I love the way they turn out and love how they look with my garland and simple heart accents on my hutch. 

I added a foam glitter heart in the center of snowflake pillow and wrapped it with pink twine to hold the heart. Simple. Looks great... 


1/17/18

CHALK COUTURE-CENTERPIECE


I re used my centerpiece from Christmas and added some pink flowers, pink 'love' drink stirrers, velvet heart sticks, and re-chalked the chalkboard with a Valentine theme. CHALK COUTURE is a great way to add unique flair to all your home decorating.  

\
I chalked xoxo with Bubble Gum chalk paste and added a couple glitter foam heart stickers. Super easy. Check out CHALK COUTURE  and see what they have to offer. You will fall in love just as I did. 


1/15/18

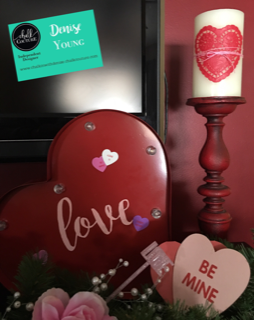
CHALK COUTURE- VALENTINE MARQUIS SIGN


For those of you that are not familiar with CHALK COUTURE you are missing out. It is so fun, so easy,  and best of all, its temporary (if you want). You can chalk boards, frames, trays, mirrors, windows, wall, doors, plastic, paper, etc... the possibilities are endless. Its is such a fun way to add flair and whimsy to your home decor. Check out the link and explore what CHALK COUTURE has to offer. I know you will fall in love just as I did.  
I found this adorable marquis heart at Bed Bath & Beyond ( going out of business sale) near my home.  I knew when I bought it I wanted to chalk it... 
Using the peach chalk paste, I decided to chalk just the word love from the "I love you" transfer set. 


 I added just a few foam sticker conversation hearts  and viola! Simple, easy, and perfect for the corner of my fireplace mantle along with some other Valentine decor. 


I reuse my Christmas evergreen/ spruce garland but take out poinsettias and add red/ pink roses and some hearts to make it more appropriate for Valentines theme. I added a red doily heart and wrapped my LED battery candles with pink twine  to give them a themed look. 


12/24/17

Day #12 of my 12 Day of Christmas Crafts- setting up a casual buffet


I have some wrapped empty boxes I use for decoration on my stairs each year. I also use these boxes to add height and depth to my holiday buffet. I plan out and place all pieces so they are accessible from all sides of my kitchen island. I throw in some holiday dishes and its a quick and easy good looking buffet set up. You can use bows (on the sides of boxes only due to hot plates possibly burning) but, this year I kept it simple and just green and reds. 

I staggered all different heights and shaped dishes throughout to give a contrast and make mor eye appealing. Simple finger foods so easy to reach. My menu consisted of pigs in a blanket, ham and swiss sliders, vegetables and bacon/ cheddar dip, hummus and pita chips, spinach and artichoke dip, cranberry jalapeno chicken meatballs, cocktail mushrooms,  holiday popcorn, whiskey pretzels, a large meat/ cheese tray, cookies and brownies. 


Don't pay attention to the partially burnt slider sandwiches-ugh! The last couple times I have made them the tops have got dark. I haven't used a recipe for the win years but I am thinking putting them in with other items in an oven temp of above 350 F is too high and causes this to happen. Oh well, they were edible and my family ate the left overs this morning. 


Thanks for stopping by... Merry Christmas! 


Several years ago I got one of these buffet slow cooker set ups. I love this thing! I just kept this on my ceramic top stove ( across from my island buffet) and had the hot foods in this all evening.