6/12/12

CAKE STAND MANIA

Wow... cake stands are so popular! You can find them everywhere! In stores, on the Internet, in craft and home decor magazines and even in the grocery store. I love, love, love them. There are many styles and sizes. And... even better... they can be really simple and inexpensive to make. They make great gifts, look great on dinner or dessert buffets, and also look great in your guest restroom holding towels or soaps. They really are my new favorite craft and gift to give.
Here are a couple of my favorite cake stands that I 've come across through Internet browsing:

stenciled  wood plaque cake stand

Colorful recycled object cake stands

Painted recycled glassware cake stands

cut wood cake stand

Blue plywood and dollhouse trim cake stand


Now here is a quick tutorial on how to make a couple kinds of cake stands for under $5:
#1
Supplies:
E6000 adhesive
1 plate (used, new)
1 candlestick (used, new)

*THE TOTAL COST FOR EACH OF THESE CAKE STANDS IS $2*
I found these glass plates and candle holders at THE DOLLAR TREE each piece for $1. 
 Here is how to make one:
Wash, remove all stickers or price tags,  and dry both glass pieces. Turn plate upside down and find center. Add adhesive (E6000) to top of candlestick edge and place to center of bottom of plate. Add weight to base and let set for 4+ hrs. VIOLA!

 I added swirl design to the second cake stand using silver and gold Sharpie markers on the underside of the plate and candle stick base. You can put in oven at 200- 250 degrees F for 2 hrs for marker to set permanently. Its recommended to do outside or underside so the cake stand is food safe. You could take things a little further and spray paint the clear glass candle stick to coordinate with the top plate.  Only paint areas that will not touch food. Spray paint is not food safe. Hand washing your cake stand is highly recommended.

As I mentioned before, I love to make these! I think they look great to serve  cake, muffins, cupcakes, etc on. You can make them various heights, colors to use on the same buffet. I love the mixture of bright summer colors. Since they are so cheap to make you can make many colors to match various decor, dishes, or Holiday decor. We are getting ready for a few birthday parties in the next few weeks. Stay tuned to see how I use them.


Ok, here is another kind that I made. The one  in the photos uses a luncheon/ salad plate and a bowl. I found these at BIG LOTS  for $2 each. Using the E6000 adhesive, I  attached the bowl to the bottom of the plate and let set 4+ hrs. You could alter this design and use a large plate or a platter on a bowl base. I made a ton of these for Christmas gifts. I made  bead and wire wrapped spreaders or serving flateware to use with the pedestal stand. Everyone loved it!

Here is a salad bowl set I made for my mom. I found this awesome bamboo salad bowl at Target. I bought some simple serving ware and wrapped with coordinating wood and natural stone beads. The bowl is mounted on short silver colored base. The possibilities are endless! Jump on the cake stand/ pedestal Bandwagon like I did. Its quick, simple, and fun.


3/28/12

Vintage Flower Hair Pins

Look what I whipped up using some retired  Stampin' Up! Vintage Flower adornments from last Spring's Occasions mini catalog. I loved these flowers the minute I saw them. The colors are fabulous... Rose red, Baja breeze, and Very vanilla. I have seen vintage inspired floral hair pins/ barrettes everywhere. 
I went to my local craft store and found  the bobby pins and a great epoxy glue to use for nearly every purpose (E6000-love that stuff) Please take caution and use this glue in a well ventilated area.  
This craft took all of 10 minutes to make from start to finish. I always let me glue dry overnight.
I think they would be perfect to put in Easter baskets

3/8/12

Mini Bedroom Makeover

Back in February I got an itch to clean, tidy, and do a mini makeover in our master bedroom. I love the bold Polo-like plaid  wallpaper  but it is just that... "BOLD". We've been in our house nearly 10 years now and I was  getting tired of  the bedding and the "whole look".  I knew I could not afford to do a huge makeover but thought I could definitely do some little changes.
           I am sorry, I did not take before pictures- kinda embarrassing. I really thought it looked  dated.
I decided to keep the wallpaper after reading and following this blog: 
http://thewickerhouse.blogspot.com/ She did a whole month dedicated to plaid. It was really cool. It made me feel better about my "Out of date" bold plaid wallpaper.

 I bought a grey bedspread, folded my existing POLO-like comforter at the bottom of the bed. 
My mom made the blue pillows from existing pillows I had. They are covered with blue cloth napkins that I found at Target on clearance. I changed my curtains from navy valances to grey panels also found at Target on clearance. I found the grey and blue ruffled pillow at Target- it was on sale not clearance.  Gosh... I love that store...
I made pennant banner using Stampin Up!'s older Sizzix pennant Die cut, a few flowers, paper doilies, felt, old buttons, ribbon and the TASTEFUL TRIM Bigz XL Dies #120893. I think it looks fresh and adorable hanging from the large shelf above my bed. I added some coordinating paper flowers to the frames and monogram Y to add to the coordination.

I found the silver plate  and milk glass vase at a thrift store. I washed, polished and added a rub on I found years ago at a craft store onto the plate. I made the love shadow box a few years ago at an after school art class. I changed the lamp shade on these tall candlestick lamps.  I wrapped the new beaded lamp shades in blue striped wide ribbon to give a coordinating look. The pussy willows in the milk glass bud vase is a perfect way to add texture to this little corner space. (we are not going to talk about my near vintage alarm clock... yes, I still use that thing and have for about 20 years). I have natural rattan baskets on the shelf under each of our nightstands (not visible from photos).

Here is a photo of our large dresser. I bought a new lamp to coordinate with my curtains and the new smaller shades on the bedside lamps. I found it at Lowes. My husband hung a large mirror that I have had in many places around the house. I love it behind my dresser.
I know its nothing over the top spectacular but I am pleased with the outcome. My husband also has commented a few times on how much he really likes it. He loves the curtains and small  masculine details. Going from only having a valance and blinds to having lined curtains and blinds is a "HUGE" difference. We have noticed how much warmer and darker our room is now. It worked out for him a few weeks back when he was switched to third shift.

3/5/12

FREEZER MEALS

Well I have jumped on the freezer meal bandwagon... its very popular now. I have read about it on other blogs  for a while and I found wonderful ideas on PINTEREST. It really makes sense. For those of you who aren't familiar, you buy in bulk and create many meals in which you then freeze in plastic containers, freezer bags or both. I did some casseroles and crock pot meals. I love my crock pot. I use my crock pot both in the summer and the winter. Its FABULOUS! I froze all my crock pot meals in freezer bags. Flatten bags the best you can, press the air out, and stack in freezer. (I have 2 refrigerators with freezers and a chest freezer) This freezer is just crock pot meals. My kitchen freezer has my freezer jams, waffles, ice cream, and things I use often. My chest freezer has large things like meats, frozen pizzas, frozen vegetables,  and heat and eat lunch and snack items.


 I got the ideas and recipes here:
She really did a nice job explaining in detail how to prep, freeze and cook when you use it.
I completed 12 crock pot meals in bags and assemble 4 casseroles. This will be so helpful for when I need something fast on those busy days or days I work.  Now what to make with those pie crusts?...

One of my family's favorite casseroles is lasagna. Its delicious on cold days and its  not hard to make either.

Lasagna
1 lb gr beef or sweet Italian sausage
(sometimes I mix half beef with half pork)
1 clove garlic, minced
1T Italian seasonings
1 1/2 tsp salt
1- 16 0z can tomatoes
2- 6oz cans tomato paste
lasagna noodles (non cook noodles)
2 eggs
3 C Ricotta cheese
1/2 C grated PParmesan cheese
2T Italian seasoning
1T Parsley
1/2 tsp black pepper
1/2 lb  fresh mozzarella cheese, sliced
8 oz shredded mozzarella cheese

Set noodles aside. Brown meat. Drain. Add next 5 ingredients but only . Simmer uncovered 30 minutes, stirring occasionally. Beat eggs, add remaining ingredients but only 1/2 of shredded mozzarella. Put some sauce in bottom of 13x9x2 inch pan (just enough to coat). Layer noodles 3-5 (enough to cover bottom of pan) in bottom, spread 1/2 ricotta mixture, 1/2 meat sauce, rest of shredded mozzarella cheese. Repeat but then add fresh mozzarella slices to top. Bake at 350 degrees for 30 minutes. (you can refrigerate or freeze at this time- bake for 45 mins if refrigerated. If frozen, thaw overnight then bake 45-60 minutes). Let stand 10 mins. Serve. 10-12 servings.


I am refrigerating my lasagna for a couple days. I wrapped top with foil and then placed lid on top of my baking dish.
My second casserole is Manicotti. I used a disposable/ bakable/ freezable Ziploc container  to store this one.

Manicotti
1/2 lb Italian sausage, browned and drained
1 clove garlic
1tsp dried basil
1/2 tsp salt
1/2 tsp pepper
1 tsp dried parsley
1- 15 oz can stewed Italian tomatoes
1- 6 oz paste
Manicotti noodles
3 C Ricotta cheese
2eggs
1/2 C Parmesan cheese, grated
2T Italian seasonings
8 oz shredded mozzarella cheese
Brown meat and drain. Add next 7 ingredients. Cook 30 minutes, Cook noodles as package directs. Beat eggs, add ricotta, Parmesan, 1/2 mozzarella, and seasonings. Mix well. Fill each pasta with cheese mixture. Place/ layer in baking dish. Cover with meat sauce. Cool. Place lid and wrap with foil. Freeze up to 2 months.

Crock Pot Chicken Spaghetti
(photo from Pinterest)
This is another casserole I made. Cheesy Chicken Spaghetti- YUMMY!!!!!
I doubled the recipe. We ate one for dinner yesterday and I froze the other. After cooking all day, I forgot to take pictures of this dish before my family devoured it. Everyone loved it.
You can find the recipe here:

3/2/12

St Patrick's Wreath

I'm at it again, Holiday wreath making again. Its hard to believe Spring is right around the corner. I love that thought.
I used:
 1)  12" styrofoam wreath form from the Dollar Store
2)  1/2 yard fabric
3)  ribbon scraps
4)  two 8 x 11" sheets of cream felt
5)  two 12 x 12" pieces of green patterned paper
6) fabric pinwheels sewn at previous time.
7) hot glue
8) Shamrock  Sizzix Diecut.
1) Cut fabric into 2" strips.

2) Wrap fabric strips evenly around styrofoam wreath form. Hot glue at beginning and end.
3) Make felt flowers following previous tutorial post.
 4) Loop ribbon and glue to the top of the fabric yo- yo.
5) Glue the flower on top of that.

Here is a glimpse of the flower bases and the shamrocks I had to choose from.


Thanks for stopping by. I hope I have  inspired  you to make something with felt flowers this week. Happy crafting, cooking, and whatever else you do.

2/29/12

Felt Flower Fun III

Here is another quick tutorial. Today I used Stampin' Up!'s #121812 Fun Flowers Die cut to make the flower barrette. Cut 5 of the same flowers. and follow steps from previous tutorial to assemble. I stitched the flower onto the barrette. VIOLA!!!

2/27/12

Felt Flower Fun

Sorry its been so long since I last posted. Its been so busy and somewhat caotic around here. We've had illnesses, different working shifts, death, surgeries, rehabilitation, and now my oldest is home with the stomach flu today. YUCK!!!! Needless to say I have not had time nor been in the mood to craft up until today. After I picked up my oldest from school, I decided to stay in my sweats and "get crafty".
I played around with my felt and sizzix machine. I love, love, love my sizzix!!!!!!!
Look what you can do with a:
1)  flower diecut,
2)a 8.5 x 11 inch and scrap piece of felt, 
3) a metal headband, and
4)  hot glue.

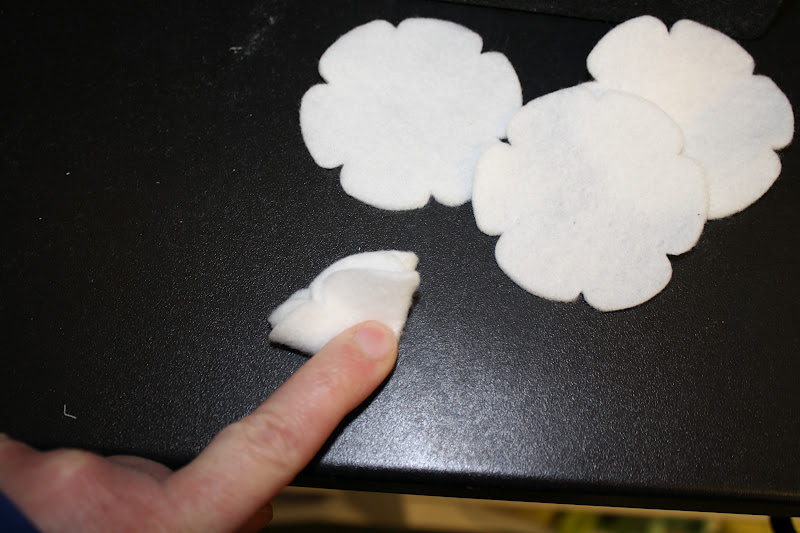
1. ) I used the Sizzix Flowers Layers #5 Diecut. to cut 6 flowers in the same color felt.
2.) Cut a circle out of same color.

3.) fold each flower in 1/2

   4.) Fold in 1/2 again (like above).

5.) Cut the tip off.
6.) I glued 4 flowers around the felt circle. Then I added the last two folded flowers to the center to make the finished flower full.
I cut out a couple leaves with some scraps then placed the entire thing on a thin headband using hot glue.

VIOLA!!!!!!

2/5/12

RECYCLED BOXES PART 2

Okay, here is a recycled oatmeal canister that my daughter and I covered with glossy paper a while ago for a school project. Its made to hold headbands on the outside and brushes, hairbands, etc... inside.

I pieced together a couple pieces of 12x 12" paper to fit around the canister. Glued it with hot glue and 2 sided tape. Glued and tied ribbon around canister bottom. I found a  small melamine bowl at a local retail store and have used it for many years for various things. I decided to attach it to the base of the canister (inverted) to give more drama.

I used SU!/ Sizzix # 121812 Bigz L Die  and #1149854 1 3/4" Scallop Circle Punch to make the flower that I added to the top. I sewed a fabric yoyo with coordinating scraps. The flower is mounted on top of the fabric yoyo. I used decorative buttoning for the center and red and white twine threaded through button and tied in bow.

2/3/12

RECYCLED BOXES PART 1

(After)
 I came across these lovely boxes that I had saved  for a couple years while cleaning off some shelves in my basement. I forgot about them. The boxes are very sturdy and once held a gift set of my favorite bath and body products. I thought they were the perfect size to store stuff and that the ribbon closure was unique and decorative. So while leaning things out, and trying to get some things rearranged and organized I thought I would alter these and put them to use.

(Before)


I measured each side of the box and cut paper 1/4" less on each edge- top, sides, bottom, and inside. I used a glossy top paper from a 12"x 24" tablet I found at a local craft store. I LOVE everything about this paper! Its glossiness, size, patterns are perfect!

I used a floral #121812 FUN FLOWERS Bigz L Die from SU!/ Sizzix to cut out my flowers from felt. I cut one flower up into pieces to make the leaf.  I used some coordinating fabric scraps and cut circles and sewed them into yoyos.
I layered each pieces and assembled with hot glue. I glued a decorative brad, and glued the entire flower onto a paper doily onto the top left corner of the box.
This one wildly matches the colors/ decor in my living room. I plan on using it in there. Not sure for what...yet. I am using the grey one (bottom box in first picture above) in my bedroom. I am storing my large/ bulky bracelets in it.  I am doing some minimal changes in my room  and  this matches the decor (grey and navy).