12/17/17

Day #5 of 12 Days of Christmas Crafts- Chalk Couture Shadow Boxes

I hosted a Friday Night  "Chalk and Cheers" workshop in my home. I introduced all the ladies to Chalk Couture  They all did a lovely job and were so creative. Their projects show just how easy Chalk Couture products are to use. 
*The finished boxes consisted of decorative paper, wreath, battery lights, seasonal verse card, and ribbon(s).* 
Each attendee cleaned their glass ( inside and outside) using rubbing alcohol. They then fluffed their 8" wreaths, wrapped a 6 ft string of battery lights within wreath, chose and folded their decorative 10.5"x 12" paper for background. We just folded paper without attaching so these boxes can be used in the future for various holidays/ seasons. 

  The ladies chose a Seasonal verse and cut out with decorative edge scissors. We attached the verse to the wreaths using painters tape. Then each attendee picked  started to chalk their preferred design onto the glass fronts.
Using red, green, and cream this attendee chose to place bulbs onto glass to give the look of them hanging on the wreath. 

This attendee loved the Mistletoe transfers and chose to chalk her verse and mistletoe image in cream but then add red pearl sticker accents  to give more texture to her finished design. 


This attendee chose to try the ombre effect using evergreen and cream. I love the way it turned out!

This attendee added 2 things using the chalks and transfers. So cute!

This one is simple and elegant using just the large mistletoe and doubled red ribbon. 
They all turned out fantastic! Most these ladies will be returning later this winter to change these boxes into Valentine Crafts. Stay tuned... 

12/16/17

Day #4 of My Christmas Crafts- Cookie Exchange Packaging

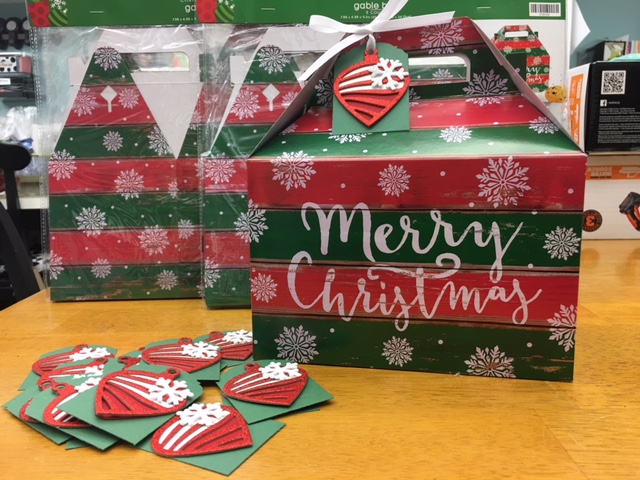
For the last 5 years, I have hosted a Christmas cookie exchange cocktail party. Each person brings home baked cookies and ingredients for their favorite Holiday cocktail. All the attendees sample  the cocktails, eat fabulous cocktail party foods,  and I repackage the cookies for all to take home. Its always a great time. In the past I have bought decorative plates stacked the cookies and wrapped in cello bags. This year I wanted to change things up. I bought gable boxes at Hobby Lobby and decided to use glitter ornament stickers to make tags for the boxes. 


 I found these red glitter chipboard stickers in the dollar spot in Target last yr after Christmas for 75% off. I saved them with the thought of using them for this year's Christmas cookie exchange tags. I cut 2"x1" strips of red and white and stuck the sticker ornament on top to simulate stripes.


I then trimmed  the excess paper from around the stickers. 


Using 2" x3" green yardstick strip, I punched a tag topper with SU! punch. 

I then hot glued the paper backed sticker to the tag. 

I wasn't completely satisfied with the way they they looked and decided to add more embellishing to further match the gable box. 

I added a foam glitter sticker snowflake to the top R portion of the bulb on the tag. 

Using white 1/4" grosgrain ribbon, I will tie the tag on the box after wrapping cookies in bag and tissue inside the box. 

I love how easy these tags were and how much they coordinate with the gable boxes. 
Merry Christmas! 


12/15/17

Day #3 of my Christmas Crafts- Vinyl on Mugs

 I am back with another Vinyl Christmas craft today. I bought my circuit (used) a couple years ago from my MIL and I love it!. I use it for paper and vinyl all the time.  It is so fun and easy to use.

 I do not like giving just gift cards for gifts.  I like to put card in  something along with small items like socks, candies, or other small inexpensive items.

I found these mugs at the Dollar Tree. I ran them through my dishwasher and then further wiped outside surface clean with rubbing alcohol. I then chose simple images and cut, weeded, and placed onto mug using painter's tape (transfer tape). 

I used stylus to rub and adhere my Oracal 651 vinyl to mug fronts. 

I have seen many ways to do these type of mugs but I chose to keep my images simple. 

I also cut a friend's Monogram with brassy gold vinyl and added to a ombre painted vase. I will fill this vase with a lovely bouquet and give to her for her birthday in January. 


12/14/17

Day #2 of my 12 Days of Christmas Crafts- Vinyl Ornament


Choose a glass or acrylic bulb and clean surface with rubbing alcohol. 

Coat the inside of the ornament with floor wax (do not shake). 

Funnel in some ultra fine glitter and move bulb around to coat evenly. Pour excess glitter out. 

Recap the bulb. 
Choose your design and cut vinyl (Oracal 651) on your electric die cutting machine. 


Remove background ( negative). This is also known as 'weeding'. 

Transfer cut image (I use painter's tape for small projects like this) to tape and peel away original paper backing. Rub vinyl onto bulb evenly using stylus, credit card, or popsicle stick. 

Peel away transfer tape. 


add decorative ribbon hanger, bow, and embellishment (I used a sticker). 

The perfect unique gift. This can also be personalized for Baby's First Christmas, First Christmas together, or other. 

Day #1 of "Twelve days of Christmas Crafting"- Vintage Bulb Wreath

Wrap a foam wreath form with tinsel garland. Hot glue sporadically as you go. The tinsel does not show through so it doesn't matter what color you use. I had this Martha Stewart Bronze color on hand and so I used this. It takes 1-2 strands to fill wreath. 


Wrap, secure, glue a hanger on back of wreath before you wrap the tinsel garland. 

When placing bulbs, use your design rules- 3, 5, or 7 work best. This rule makes your design more appealing to the eye. The design flows better. This is the same for floral design. 

As you make the wreath, look at it from various angles. I place mine on the floor and look from overhead. I hang it on door to get a good view. I also look at it form the sides on the table top. 

I add vintage "fluff" to more bare spots around the wreath. This one I added vintage plastic holly leaves. 
This is one of the wreaths I made for myself 3-4 yrs ago. I collect felted Santas and decided to add one to my wreath. 
Here are some more wreaths I have been working on this season- 

I have a prelit wreath I hang on my kitchen pantry door every year. Each yr, I change the theme. I decided to keep it very simple this year. I wrapped berry garland and placed a wood and metal hanging sign inside the wreath. Easy! 

I chalked the 2" wide canvas ribbon using my red Chalk Couture paste and a transfer. I then added to a 10" embroidery hoop and added a red decorative simple bow and mistletoe on top. Another simple but different design. 

I made a deco-mesh wreath using various mesh, ribbon, and floral picks. I still haven't decided whom to gift this too. Hmmmmm... 

11/4/17

Chalk Couture Christmas Wreath Shadow Box

I am offering a Christmas wreath shadow box workshop to introduce the concept of using chalk pastes and fabric transfers. It should be fun. I plan to offer the attendees an option for joining a club and making various items ( every other month) to fit in the shadow box for  various Holidays. 

I added mini lights to the wreath, attached decorative paper to background, added the wreath inside, hot glued the ribbon to the glass ( it will peel off when ready to change), and chalked Merry and Bright at bottom of front glass. Easy Peasy... 


11/3/17

Chalk Couture Everyday Photo Board

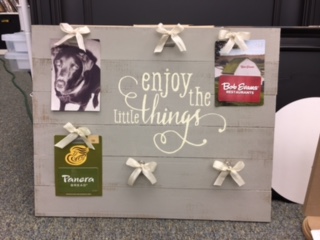
I needed a way of presenting 5 gift cards and a greeting card for a gift. After some time searching and trying to come up with a plan. I bought a wedding photo board at Hobby Lobby knowing I would change it to an everyday photo board. 

I painted board  and clips with gray chalk paint. 

I added an everyday verse using Chalk Couture transfer and chalk paste.

I tied simple bows on each clip using cream color seam binding. 

Here it is completed. 
(my gift cards and picture on it to give you a sense of finished project). 
The entire project took less than 1 hour (including time to allow paint to dry). I'm hoping the recipient  likes it as much as I do. 

11/1/17

High Tide Lighthouse

Finally playing around with this 2-step  SU! stamp set. The entire image is done with ink and stamps, no coloring. Its just a matter of layering the stamps to build the picture. Ink Colors used: Real Red, Pool Party, Momento Black, Crushed Curry, Garden Green, Sahara Sand, and Soft Suede. 
Cardstock used: Real Red, Pool Party, and Very Vanilla.