My youngest daughter and I drove 45 minutes to a store grand opening just to see Michael Symon. We love him! I adore his personality and his laugh. He's seems so down to earth and everything he cooks looks awesome. He is so interesting to watch when cooking on Iron Chef or The Chew. I just bought his new cookbook but was unable to get my book signed at the store. Oh well, maybe another time.
8/20/13
8/18/13
BACON SCALLOP PIZZA
I try to make a new recipe 1 time each week. I came across this recipe from browsing on Pinterest. I am very addicted to Pinterest. I am on that site 1-4 times daily (maybe more). This is an easy Paula Dean recipe that really is yummy. I used a pre-made pizza crust ( the original recipe uses fresh pizza dough/ crust).
Mix 1 C of marinara sauce from a jar with 1/2 C sour cream and fresh chopped herbs. Spread onto pizza crust. Cut the large raw Scallops into quarters. Placed randomly around the pizza and then sprinkle crumbled cooked bacon and Italian shredded cheeses. Bake at 350 F for 20 minutes or until Scallops are completely cooked. I served with fresh salad (all from my garden) and some white wine. A perfect light summer dinner.
8/17/13
Chic Baby Gift Ensemble
I found these adorable 3D stickers on clearance at a local craft store and thought they were adorable. I just love the fabric, her hat and belly. The purse is great too. Doesn't this card and colors look great with the black and white patterned wrapping paper? I love that its not your everyday baby shower wrapping paper. Notice the cupcake box on top right? I wrapped some coordinating paper around the cupcake box and left the top window open. See onesie cupcakes in previous post.
8/16/13
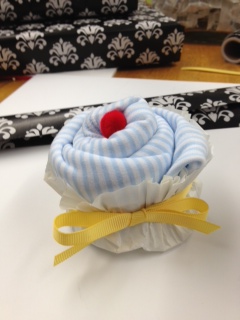
ONESIE CUPCAKES
I folded and rolled four 0-3 months onesies and placed in large cupcake papers. I tied each cupcake with a coordinating ribbon and placed a small red pom pom (cherry) on top. I found the cupcake box at Walmart for under $4 for 3.
I got the idea from Pinterest.
Here is a close up. I think they turned out adorable! Super cute, Super affordable, and Super easy.
8/15/13
MEGA MEET IN MAY
In May, I went on a little road trip with some girlfriends and my mother in law. We had a great time and did some major shopping. The highlight of my trip (besides the delicious Sangria at dinner one night) was to see T!m Holtz in action. I LOVE LOVE LOVE him! I enjoy talking to him and watching him demo many awesome techniques. I can watch him for hours (and I did). This is my third time that I have had the pleasure of meeting him. He is truly an amazing artist and person.
8/14/13
Easy Polka Dot Cake Plates
Bought these cheap blue plates and glass candle holders for a dollar at our local Dollar Store.
Used E6000 adhesive to glue together. Allowed to dry 24 hours.
Used white circle label stickers to add polka dots.
Here they are finished. I used these on the dessert table at my daughter' s Graduation Party. The stickers came off easily when the plates were washed. I loved the way they coordinated with all the other polka dot decor. This craft was so affordable and easy. It cost $6 for everything.
8/12/13
BLUE POLKA DOT GRADUATION PARTY
I've really slacked with posting to the blog this summer. Been so busy helping my husband recovery from knee replacement; dealing with puppy mischief and destruction; and softball. My oldest daughter graduated from high school in May and these are photos from her party. I really enjoy doing parties and planning events. I would love to do this on the side along with my 'real' job. The candy bar (above) was a huge hit. I shopped for various clear vases, jars, and bowls at various discount stores. I shopped for blue and white candies for weeks. This was the most difficult part. The shelf was re painted (it used to be hunter green) to match other furniture in my kitchen. I've had this shelf for many years. It folds up and stores easily. It fits perfectly on this small angled wall in my kitchen. I love using it.
I made the cake topper using decorative papers, paper plates, crepe papers, stickers, silk flowers, and jewels. The cake measured 7" and 9" circles. They fit perfectly on my 13" cake platter.
I decorated my kitchen hutch with Senior pictures, various awards, various sports trophies, scrapbooks, banner, and multiple vases of flowers. It was a perfect back drop for the dessert table.
I hung various lanterns, tissue flowers, crepe streamers, and balloons from the main light above the island in my kitchen. I have done this for various parties and events. I love the way it looks. We served meatballs, rigatoni, antipasto salad, and various fresh breads along with dipping oils.
we used the tent and our two level deck to house all the people. The weather held off and everything turned out great.
I made a 13 x 13" frame using the various blue and white printed papers and one of my very favorite photos of my daughter. This sat on the gift table.
I made the card box by covering a box with blue and white dot wrapping paper the slot opening is on top. The monogram center design is similar to the cake topper.
I bought various white flowers and arranged in my favorite milk glass vases. I scattered them around on the gift table, food tables, kitchen hutch, and outside tables.
I found this tall hand blown vase on clearance for $5.50 and knew I wanted this to be on the dessert table.I added a crepe paper rosette and a monogram to make it look more unique. I arranged various flowers to coordinate with the decor. Love the blue and white asters.
this is another view of the indoor decorations.
I bought cheap blue plastic ice buckets at a Dollar store and planted various blue/ white flowers in them. Then I hot glue various matted pictures of my daughter through the years on skewers and placed 3-5 in each container. I used these as center pieces on all the outdoor tables under the tent and on the deck. It was an easy and unique added touch.
7/23/13
Altered Mirror- Melissa Frances Style
Instead of throwing the frame away when the mirror broke, I decided to alter it using some products I acquired at a Scrapbook Convention this Spring. I have always been in love with Melissa Frances products and style. I collaged various papers, added resin roses, a butterfly, paper flower, dragonfly, and a pennant.I added pearl paint to already distressed metal frame. I'm pleased with the way it turned out.
I gave it to my grandmother. She loved it so much that she put it on a table at the front door so everyone who visits can see it.
4/21/13
Kraft Quatrefoil
Just like the chevron pattern last year, quatrefoil patterns are one of the hottest things in paper crafting right now. LOVE!!!! I found this adorable Quatrefoil wrapping paper in the Dollar Spot at Target a while ago and fell in love instantly. I used the extra wrapping paper on the front of the cards. I love making gift wrapping and my cards match.
It all matched so well. I love the added splash of color.
I hope its not too informal for the Bridal Shower I am attending. I wish I had a fabric Black ribbon instead of the black curly ribbon but, it works.
4/20/13
April Workshop
These are two projects made at today's workshop. I love the mix and match paper patterns. It reminds me of Waverly designs or Anna Griffith style. I used OH, HELLO #130733 stamp set from the current SU! mini catalog to create both.
I stamped the flower onto Summer Starfruit CS using bleach (splash proof bleach works great). I love stamping with bleach. You can also mix bleach and water in spritz bottle to spray on and make an awesome background. Every color CS bleaches differently. Its really fun.
I elegantly decorated small peat pots using matching papers, butterfly punch, red jute, white organza ribbon, rosettes, and T- labels. I bought the T- labels at WalMart (Garden Ctr).
3/24/13
Stampin' Up! has done it again! Another Sneak Peek at an upcoming new product available now for short period of time (15% discount) and then again in the new catalog to be released this summer. This And That reminds me of a Smashbook. Love it! The bundle includes Washi Tape, papers, book, stickers, etc... Everything to complete a cool trendy project.
3/20/13
NOT TOO SHABBY
I have been on a mission trying to find these vintage paper frame (easel and folder style) in many antique and thrift shops in a 50 mile radius. I had luck finding a few. They've been sitting here for a couple weeks and I have been waiting to do something unique with them. Although I do not regularly do grunge style crafts, I love playing and exlporing this style. Its always so fun and Tim Holtz makes it easy. I love his tutorials and products.
When I came across the TATTERED FLORAL challenge on T!m Holtz' blog site, I knew that I wanted to use a frame and dabble into a project that I seen in a local vintage shop. I attached this distressed cardboard picture to the front of this tattered frame using epoxy and hot glue. I used T!m's metal corners, and LOVE key. I wrapped wire (wish I had rusty wire) around the frame and strung distressed beads on the front. I constructed the flower as T!m directs from his blog. I didn't have the printed tissue paper roll so I used vintage music sheets. I layered the tag with flower, key, fibers, and love bird picture. 
I LOVE how it turned out and cannot wait to make more next week during my Spring Break. I think I may make some easter floral jewelry using the TATTERED FLORALS. Check back...
3/18/13
ALL DRESSED UP FRAME
This die cut (framlit) set is ADORABLE! Totally girly... its great without using the coordinating stamp set but, even better when they are used together. LOVE IT! I found these frames (black, blue, green) last Fall clearanced at Target in their discount section. I knew I could use them for a project in an upcoming workshop and decided to use them with this.
I have mix and matched a ton of colors from the BRIGHTS family to make a cheerful project. I used PACIFIC POINT, OLD OLIVE, MELON MAMBO, and TANGERINE TANGO. I punched the dress and dress form and mounted it on embossed card stock (glass under card stock). I tied a big pink tulle bow around the frame and slid a pre- made tag (also got at Target clearanced) under the bow.
I made a cute little purse using 3 retired paper punches (tab, oval, and flower). Then I punched another oval to make handle using Large Oval Punch #119055. Stuck a rhinestone on the front and viola! Isn't this the cutest idea you've seen in a long time? I think so. Too bad the tab is retired. Maybe you can find them on eBay...
3/17/13
Subscribe to:
Posts (Atom)