10/26/13

HALLOWEEN TREAT PACKAGING 2013

tag a bag gift bags, Washi Tape, misc paper journal pieces, MS Halloween stamps. I used the bag for a Reeses Peanut Butter cup and a Halloween Card. 

Candy Corn cardboard box, colored candy apples, accent ribbon make the perfect gift container. This one has a medium Halloween pillar candle in it. 

I recycled a chocolate container (Target) using various Halloween papers and adding a ghost image on top. I glued plastic spiders all around the container and added a cute Halloween votive holder and pumpkin candle in it. 


10/25/13

GRIM REAPER HALLOWEEN- Just for Fun

This is way outside of my box. My husband tells me that most of my cards and projects are feminine. I saw these couple stamps and thought this was more masculine and a little creepy. I inked the background using Distress inks and water. I stamped both images with black. I used a white uniball gel pen to add accents to the house and moon. I used a Distress marker to add detail to the grass.  I cut out the fence and the grim reaper and mounted them using pop dots.  I stamped the small witch over the moon using permanent black ink. Done! A quick, non traditional color Halloween card with a creepy masculine flair. 


10/24/13

DREAMS OF ART- Studio 490

I used distress inks ( olive, mustard, and barn door) for the background. I stamped the cup rings with SPILLS AND SPLATTERS (CMS028) from SA. The flowers are done with DREAMS OF ART- STUDIO 490 ( LCS006) from SA. I used Accent #2 from Sizzix for the swirls. Love the brightness of the flowers on the craft dyed background. I hope the recipients like them as much as I do. 

10/23/13

HAPPY H-OWL-OWEEN- Stampendous


Got this stamp yesterday clearanced  at Michael's from $15 down to $6 (score!). I LOVE, LOVE, LOOOOVVVEEE owls. I also love Halloween and thought this was a perfect mix of both. 

I stamped onto craft cs using black ink. I used my PAN PASTELS to color the moon and owl. 
 I stamped  the image again on craft, cut out, attached with pop dots over top the first image. I colored the eyes, and hat using Prisma Color pencils. I inked edges of card and mats using distress ink. I used a Uni ball white gel pen to add highlighted accents. I added some black pearls on the bats bodies and witch hat. 

I used a 1 1/4" circle punch, cs scrap strips, and MS owl and branch punch to add further detail inside the cards. 


10/22/13

HALLOWEEN LAB- The Chemist


I am in love with Tim Holtz line of products. They are so fun to use and play with. My husband went with me to a local Stamp Convention  at the beginning of the month and bought me a few stamps sets and accessories from his new line (keep checking back to see what I do for the Holidays). I got my inspiration from the SA CHA- Summer 2013 catalog and also the display board at the convention. LOVED IT (so did the hubby).  I think the man image has  got a steam punk vibe and love the idea of using it for Halloween. If you look very close you can see a potion jar hanging from the orange twine. I LOVE this detail. I used Tim Holtz Idea-ology Corked Vials and added a memo pin in the top cork for hanging it onto the twine. I out alcohol ink inside the bottle to tint it the green color. After tinting the background and stamping the image,  I  colored the sleeves, hair, and facial hair using white PrismaColor  Pencil. I added a metal skull and cross bone and red and white vial labels from his idea-ology line. After taking these photos I added distress blank stickles to the spider and orange to the test tube in his hand. 


 I found the German Die Cut spider web at a local Wholesale private sale this past weekend. I thought they were so awesome! I purchased other Holiday foil die cuts at the same sale and will be using them in the near future for holiday projects.  I got the twine out of the trash at one of the schools I work in.  The art dept cleaned out old items and got rid of numerous unused/ old items. The labels on all the twine that I took were dated  1979. All of them were  in perfect condition (not dry rotted). I use it all the time.  Love finds like that...

10/21/13

October 2013 Workshop


Here are the projects made at my latest in home workshop. One pop- up (wiper) card, treat gift bags, envelope, and potion bottle. The guests were very pleased with their products. I loved them too. Halloween is my favorite theme to stamp and create. 

#131370 Tag A Bag Gift Bags $3.95, #132156 Witches Brew Washi Tape $4.95, #130580 Halloween Bash stamp set, #132792 Pumpkin Pie Goody Gear Set $4.95 all used for making both gift bags. I love the small cellophane bags kits- so affordable and adorable!

I came across the directions for this card here: 
The sentiment ( spooky) pops up when you pull both sides of the card. It was a hit! So cute! Again, I used #130580 Halloween Bash stamp set and #125598 Labels Collection $26.95 to cut out shaped mat. MS spider punch and random brads add the final touches. 
I came across these old Log Cabin Syrup bottles ( the kind we had when I was a kid) at a local estate sale. I knew right away that I wanted to use them for Halloween potion bottles. I dry brushed MM acrylic craft paint ( purple, orange, silver) onto the glass bottles. Allowed to dry overnight. I used #129381 Ovals Collection $26.95 to cut out the oval mats. I used up some older SU paper. I found these glamorous spiders at Hobby Lobby last  fall. The tag was made using Sizzix (Tim Holtz) skull die cut and poison stamp. I used SU # 119854 1 3/4 " scallop punch $16.95

Finished the tag with SU washi tape and black pearl accent. LOVE!


9/9/13

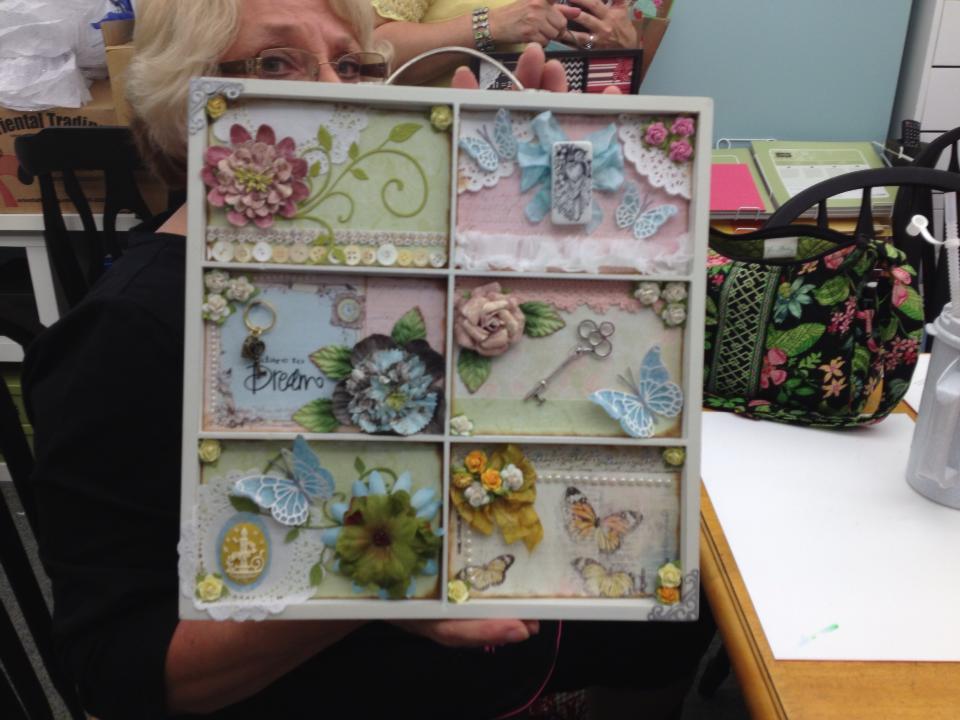
SHADOW BOX DRAWER DISPLAYS


This past Saturday I had some crafty friends over to create these adorable shadow box frames. Everyone brought their own frames and  papers but then used my tools,  embellishments, and ideas to complete their frames. I think everyone of them turned out so adorable. So unique and true to the artisit's style. What do you think?

8/20/13

Michael Symon

My youngest daughter and I drove 45 minutes to a store grand opening just to see Michael Symon. We love him! I adore his personality and his laugh. He's seems so down to earth and everything he cooks looks awesome. He is so interesting to watch when cooking on Iron Chef or The Chew.  I just bought his new cookbook but was unable to get my book signed at the store. Oh well, maybe another time. 


8/18/13

BACON SCALLOP PIZZA

I try to make a new recipe 1 time each week. I came across this recipe from  browsing on Pinterest.  I am very addicted to Pinterest. I am on that site 1-4 times daily (maybe more).   This is an  easy Paula Dean recipe that really is yummy.  I used a pre-made pizza crust ( the original recipe uses fresh pizza dough/ crust). 
 Mix 1 C of marinara sauce from a jar with 1/2 C sour cream and fresh chopped herbs. Spread onto pizza crust. Cut the large  raw Scallops into quarters. Placed randomly around the pizza and then sprinkle crumbled cooked bacon and Italian shredded cheeses. Bake at 350 F for 20 minutes or until Scallops are completely cooked. I served with fresh salad (all from my garden) and some white wine. A perfect light summer dinner. 


8/17/13

Chic Baby Gift Ensemble

I found these adorable 3D stickers on clearance at a local craft store and thought they were adorable. I just love the fabric, her hat and belly. The purse is great too. Doesn't this card and colors look great with the black and white patterned wrapping paper? I love that its not your everyday baby shower wrapping paper. Notice the cupcake box on top right? I wrapped some coordinating paper around the cupcake box and left the top window open. See onesie cupcakes in previous post. 


8/16/13

ONESIE CUPCAKES

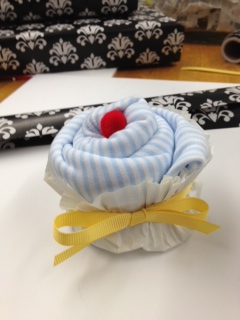
I folded and rolled four 0-3 months onesies and placed in large cupcake papers. I tied each cupcake with a coordinating ribbon and placed a small red pom pom (cherry) on top. I found the cupcake box at Walmart for under $4 for 3. 
I got the idea from Pinterest. 
Here is a close up. I think they turned out adorable! Super cute, Super affordable, and Super easy. 

8/15/13

MEGA MEET IN MAY

In May, I went on a little road trip with some girlfriends and my mother in law. We had a great time and did some major shopping. The highlight of my trip (besides the delicious Sangria at dinner one night) was to see T!m Holtz in action. I LOVE LOVE LOVE him! I enjoy talking to him and watching him demo many awesome techniques. I can watch him for hours (and I did). This is my third time that I have had the pleasure of meeting him. He is truly an amazing artist and person. 


8/14/13

Easy Polka Dot Cake Plates

Bought these cheap blue plates and glass candle holders  for a dollar at our local Dollar Store. 
Used E6000 adhesive to glue together. Allowed to dry 24 hours.

Used white circle label stickers to add polka dots. 

Here they are finished. I used these on the dessert table at my daughter' s Graduation Party. The stickers came off easily when the plates were washed.  I loved the way they coordinated with all the other polka dot decor. This craft was so affordable and easy. It cost $6 for everything.