10/13/10

ALL WRAPPED UP

 I used a  movie theater- size MIKE & IKE to create this spooky candy wrapper/ gift. The box is approximately 7.25 x 3 inches. I wrapped the box of candy with Nite Owl paper.  I cut the small pieces for the sides of the box seperately. Used decorative edged scissors to cut the label and then added a skull label found on one of the sheets from this pack of  "spooky...ooky" paper.


 I added color and depth with the STAMPIN' PASTELS #120962 (all new colors in this kit). Ran some Cajun Craze cs through the machine to emboss with the new embossing texture folder SPPIDER WEB #120889. Attached chalked image to box front with Dimensionals #104430 so that ribbon would lay flat under the image.

10/11/10

STAMP CLUB PROJECT- PAPER PUMPKINS

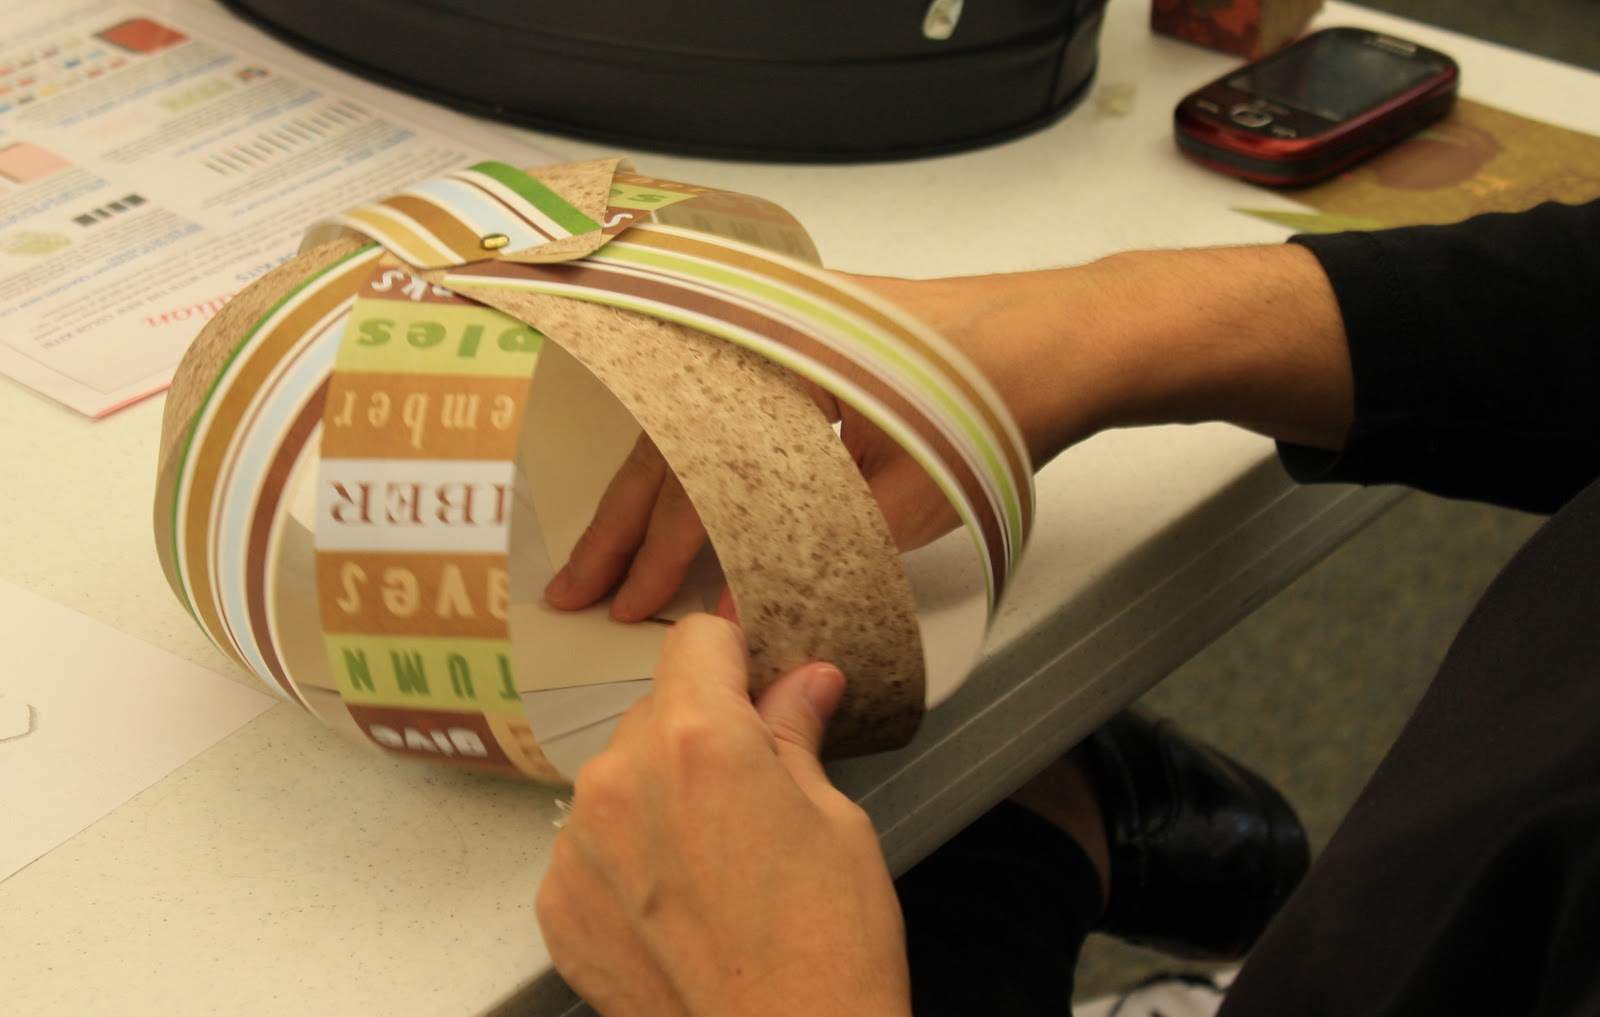
We made these paper pumpkins last Saturday at my last Stamp Club meeting. (A similar but smaller pumpkin is shown on page 27 in the Idea Book and Catalog).  I used misc. fall themed papers, large paper connectors (brads), craft wire, tulle,  and paper leaf cut outs. Absolutely "NO STAMPING" on these. The really are simple to make, I made all these (pictured above) with the leftovers not used at the workshop (I cut way too many). Thicker paper and cardstock work better than one sided paper. You can stuff these with crumbled tissue paper to help keep its shape. Everyone individualized theirs with color choices, leaf choises, and tags.

Use 9-15 2x12 inch strips of cardstock and/ or designer papers. Lay the strips in design order (A-B-C pattern works great). Punch both ends 1/4 inch from ends and centered with CROPODILE #108362. Place brad in one end to hold pieces together. Flip strips over (white side or non dominant side face up). Take first strip on top and start turning into round shape, add brad. Move in sequence around, taking the next strip then the next until all up, and attached with brad. Fasten brad. take 6 inch piece of craft wire and wrap one time around brad head on top. Punch some leaves or tags and thread onto wire. Curl wire ends using stylus or dowel (curling the wire will hold your tags and leaves on but also add dimension and detail). Spread the strips out evenly and form to look like pumpkin. See pictures.
 Here are some close- up pictures of a couple pumpkins. You can see the leaf, wire, and tag details. The one on the left is using one (busy) pattern paper with a contemporary style- clean/ simple. The pumpkin on the right is more country/ shabby style. Scroll back to first picture and you will see a couple pumpkins done with non traditional fall colors. They are done with blue, green, brown, white. I also made a Halloween style- candy corn, white tulle and black ribbon and lace.


10/9/10

DRY EMBOSS PUMPKIN TAG

 I am going to share another quick technique with you today. This will work for anything you want to look defined or round like balls, pumkins, bear's bellies, balloons, etc... It is real simple and once you've tried it you just may do it every time you make something that has an accent that needs to look round.
 First you place your stamped, colored image onto a foam surface (thick craft foam) and moisten with small amount of water with use of a mini spritzer. Rub stylus over image on front (direction of image grain) many times to break up cardstock fibers. Flip image over and do the same thing on opposite side (same direction).
 It is  hard to see in this photo but, it makes the pumpkin look 3D (round). It pops up off the paper. You can place somthing behind it (Stampin dimensions, crumbled paper pieces) depending on how 3D you want it to look.
 Above are 2 samples I did using the GREETING CARD KIDS stamp set (#120633) and retired Halloween verse. Colored pencil and Gamsol blending solution. Thanks for stopping by. Hope you have a great weekend.

10/4/10

FAVORITE ALE CHICKEN WITH CARMELIZED ONIONS


Hello, if you live in NE Ohio, like me, then your weather has been damp, cold, dreary and gray. Fall is really here. The leaves are turning (quickly) and apples, pumpkins, and sqash are plentiful. I want to share a fantastic "warm you up" recipe with you today. My husband and I got this pan with roasting insert for our birthdays in June. This ceramic baking pan works on stove top, oven, or grill in heat up to 500 F.
A link to the pan is here:
http://www.qvc.com/qic/qvcapp.aspx/view.2/app.detail/params.CM_SCID.coll.item.K27287.desc.Technique-Flame-10-Round-Covered-Everyday-Pan
I cannot find a link to the upright chicken roaster. I have seen them online and at Walmart (camping/ grilling section) any simple "beer can" chicken rack should work.


INGREDIENTS:
3-4 lb. whole chicken, cleaned and dried
1Tbs. Vegetable oil
2 Tbs. brown sugar
2Tbs. paprika
1tsp. dry mustard powder
1 tsp. chili powder
2Tbs. coarse sea salt or kosher salt
2tsp. coarsely ground black pepper
1 bottle of favorite ale
3 large sweet onions, sliced
1 bay leaf
4 sprigs of fresh thyme (optional)
                                      
Brush chicken all over with vegetable oil. Make the rub by combining brown sugar, paprika, mustard, chili, salt, and pepper. Rub the mixture all over the chicken, inside the cavity as well as all over the skin.  Preheat oven to 350 F. Place chicken roaster inside the pan and pour beer into the cup center of the chicken roaster dish. Place all remaining spices inside the beer. Place chicken ove rthe center of the chicken roaster. Season the onions with salt and pepper and place them all around the chicken. Roast until the internal temperature is 165 F. A 4 lb chicken should take around 75 minutes.
                                   
Allow chicken to rest/ cool 5 minutes. Carefully remove the chicken and serve with the carmelized onions. Pour drippings over chicken, potatoes and/ or vegetables.  
 
If you decide to make this recipe, let me know what you thought. I would love to hear from you. Thanks for stopping by.

10/1/10

FROM THE CRYPT

Stamped some more Halloween things today. Dug out the set FROM THE CRYPT (#115460) Used the layout on page 25 from the Idea Book & Catalog as inspiration for my tag and card layouts. This picture is not very clear, scroll down to see some more up close.

Here is a close up of the tag. I used the MODERN LABEL PUNCH (XL #119849) and 1 3/8" CIRCLE PUNCH (# 119860)  to add detail behind the main image. I also used the 3/4" CIRCLE PUNCH (#119873) that I stamped BOO! onto. I hand cut the bat image and folded the wings to add dimension, like it is flying. COPPER MINI BRADS (retired) and COPPER EYELETS (#105319) to further embellish. I distressed the edges using the distress tool from the CUTTER KIT (#106958).
I used the Awesome TASTEFUL TRIM Bigz Die (#120893) to add further paper detail to the side of the card and to the botom of the tag. This die cut is awesome (like I said before). Ric Rac, baker's twine, and fabric are all the rage in the paper crafting world right now. I'm so glad SU! is up on the latest and greatest. They really make it fun to craft. 
                                    
Have I told you how Fantastic the new COLOR COACH (#121620) is? I cannot live without this sucker. It makes everything much easier. It takes the thinking out of planning and making projects of all kinds. I am using the Sweet Pea combination CAJUN CRAZE (#119684), ALWAYS ARTICHOKE (#105119), and PERFECT PLUM (#101889). I would have never used these exact colors on a Halloween project prior to owning this. It opens your eyes to a whole new colorful world. Well, enough rambling, I'm off to bed soon, I have a busy day planned tomorrow. I am attending the Adventures In Stamping convention tomorrow :) I need all the sleep I can get, it may get crazy...  

9/29/10

DARK & DREARY ENSEMBLE

Here is a close-up of coordinating projects I made to go with the cards and Bingo Cards posted earlier this week. I love how easy SU! makes it to coordinate stamps, accessories, and colors. No other company can do this well. I don't have to search for colors and coordinating products, I trust SU! to do that for me. They make crafting that much easier.
I recycled a spice jar and decorated it using TANGERINE cs (#111349), TEXTURED BLACK cs (119922), GOING GRAY cs (retired), RAVEN LACE trim (#120988), DECORATIVE LABEL PUNCH (#120907), misc. colored baker's twine, and plastic spider. I used hot glu eto adhere the label, and spider. Distressed the edges of the candle image with TANGERINE INK (#111834) using SPONGE DAUBERS (#102892). I filled the jar with black and white gumdrops. Now, which "lucky", or should I say "unlucky", person should I give this to?  

I love making tags! They are one of my favorite things to make. They work for just about everything. They can be super easy to very elaborate but, always so fun to make.  "When in doubt, add a tag". This goes for card fronts, scrapbook pages, candles,labels, gifts, etc... I used GOING GRAY cs ( retired), BASIC GRAY cs (#121044), BASIC BLACK cs (#121045), TANGERINE (#111349), RAVEN LACE trim (#120988), DARK & DREARY stamp set (# 121151), SPIDER WEB TEXTURE FOLDER (#120889),  decorative edge scissors (retired), misc. ribbon and baker's twine, misc. spider web edge punch,  and plastic spider. Thanks for stopping by. Hope you enjoyed the ensemble and my quick/ easy ideas. Make sur eto stop by again.

9/28/10

BINGO ANYONE?

These could not have been any easier. The cards are cut directly from 2 sheets of the NITE OWL DS paper (#123012) for a total of 8 Bingo cards. I mounted each 5.75in. card onto TANGERINE CS (#119949).  I think I will use these at my daughter's Halloween Party at school (her last school Halloween party).  If you are a fan of this idea you need to check out the BINGO CARD stamp (#120851) on page 29 from the Holiday Mini Catalog. You could make a variety of themed Bingo Cards ie: Baby Shower, Christmas Party, Easter, Thanksgiving, St. Patrick's Day, Valentine's, or Birthday.
In the mini catalog they use black jellybeans for  Bingo markers but, I thought that misc. Halloween punched images would be a fun and inexpensive way to mark the card. I used SU's BITTY BAT punch (#119279) along with other small punches (scalloped square, spider, witch, and owl).

9/27/10

DARK & DREARY HALLOWEEN

I had time to do some stamping today- yeah! Finally! I bought the entire line of 1800's London Halloween Suite. The minute I saw this line of products, I knew I had to have them. I used the verse/ large rectangle stamp from the set DARK & DREARY (#121151); the gray patterned paper  from the NITE OWL DESIGNER PAPER PACK (#123012); BASIC BLACK; BASIC GRAY; TANGERINE cardstock; 1/2" LACE TRIM (#120988) to complete the cards.

Speaking of 1/2 " LACE TRIM, have you bought this yet? If you haven't, shame on you! It is great! It ties easily, lays flat, and is so charming added to a variety of surfaces. Just look at it against this tangerine cardstock before I added it to the card fronts. I assembled everything in an assembly line and thought these looked so great all by themselves. "Kinda Spooky"

I wanted to share an easy tip for adding a little bit of color to this intricate image. First, I stamped the images on a going gray (retired) cardstock. I  then cut out the images with decorative edged scissors (retired) and distressed jagged edges and center circle using TANGERINE CLASSIC INK (#111834) with a SPONGE DAUBER (#102892). The diameter works perfect to add a little color to the circle of this image. I cannot live without these daubers. I use them for almost every project.


Viola! Didn't it work out perfect? How else could you add the color in a perfect circle? You can use this technique on many circular images and accents. I have never stamped on a gray and I love the look of it with the distressed edges. Stay tuned for some more fun ideas using this line of products, make sure you check back again this week. Thanks for stopping by.

8/30/10

I love Halloween and almost everything that goes along with Halloween. It is my absolute favorite time of year.  Caramel apples,  beautifully colored leaves, crisp air, autumn decorations, hot cider, evening outdoor fires, sweatshirts,  and spooky  festivities.What could be more fun than a Halloween Party? Its the perfect time for everyone to pretend they are someone/ something else. My friends and family call me a Halloween "FREAK". The funny thing is that my brother, best friend, and next door neighbor are all 'Halloween Lovers' too. I am a sucker for anything orange and black with bats, cats, witches, and ghosts.
These projects are for my upcoming club meeting I have in less than 2 weeks. I chose to use WICKED FUN #117400 ds paper and the coordinating WICKED COOL # 120600 stamp set.  Both are new to the SU! line and can be found on pages 22 &23  of the main idea book and catalog. Those of you that don't have a current catalog can view any of the current catalogs here: http://www.stampinup.com/us/enu/default.asp.

My Halloween "Spooky" creations were totally insired by two Stampin Up! demonstrators that I follow on a daily basis through their business blogs ( Mary at http://www.stampinpretty.com/ and Angie at http://www.chicnscratch.typepad.com/chic_n_scratch/page/2/ ). Both women are so creative and do such wonderful things with SU! products.
The Spooky Mini Bag is so easy and adorable. It will hold Reese's Cups, Hershey Nuggets, Peppermint Patties, Fruit Snack Packs, or anything that is around that size. It is hand cut and folded (no die cut machine needed) The flap is held closed with velcro- how perfect! You will get 3 from one sheet of 12 x 12 inch paper.  The finished mini bag measures 3x3 inches. The bats are from SU!s new large bat punch #119279.
Directions for this project can be found here: http://www.chicnscratchlive.com/ 
(just scroll down through all the videos until you get to the spooky bag)

Those ladies that are attending my club will get written and pictorial directions.
Directions for an easel card can be found  here: http://www.splitcoaststampers.com/resources/tutorials/easelcard/
This was the first easel I have made- super easy! Will be making them again. I think they will be perfect for Christmas photo cards. I used the color spritzer tool to splatter ink around the image. I distressed the edges of the image and cardstock with basic balck ink and a sponge dauber. Viola!

Materials used: 
Wicked Fun DS Paper: #117400  $11.95  pg 172
Wicked Cool Stamps #120600  $14.95  pg 23
Bitty Bat Punch #119279  $15.95  pg 201
Extra Large Scallop Oval Punch #119856  pg 201
1 1/4 inch circle Punch #119861  $16.95  pg 203
Large oval Punch #119855  $16.95 pg 203
Color Spritzer Tool #107066  $12.95  pg 195
Old Olive Grosgrain 1/4 inch Ribbon #111368  $4.95   pg 191
(Rich Razzleberry/ Old Olive Markers)

If you have any questions, please feel free to email me. I would love to hear from you. thanks for stopping by. Be sure to stop by and see some more Halloween creations. I will be making many more creations up until that Haunting Day.


8/18/10

Well, my summer has officially ended.  I return to work tomorrow.  :(   This summer just "flew by". The majority of the summer was consumed with softball, baking, cooking, canning, and freezing. I worked a secondary job a couple days a week from June through beginning of August (just to keep me busy- with extra income).

Now I am  planning a big camping trip in a few weeks.I did some grocery shopping and started planning our campfire meals. If anyone knows any good fire/coal cooking recipes please email or let me know. I'm always looking for some new ones. My girls love to use pie irons. We take a ton of bread to make pies, pizzas, etc...

 I have done very little stamping this summer (I have done enough purchasing but not put anything to use). I have made a few gifts, tags, projects, but not as much as I expected I would once summer began.  

I have joined FACEBOOK and got in contact with many people whom I have not spoke to in years.  I swore I would not take the plunge but, I did. I am enjoying it- although, I am not playing any games.

I am hosting a make-n-take workshop this weekend and have most everything prepped. Hope things go well- this will be my first workshop since the new catalog has been released. I have some other workshops in the works but wan tto run some ideas by my attendees.
Ok, it is getting late and I need to get some sleep. Enough rambling. I just wanted to touch base and let the few followers I have know that I'm still here. Just not had much stamping MOJO.
Enjoy the rest of the week.

8/5/10

FOX & FRIENDS BIRTHDAY PARTY FOR 6

I have started selling items on ETSY. This is one of the kits I have for sale here:   (http://www.etsy.com/listing/53163104/unique-adorable-birthday-party-ensemble) This set includes paper party hats, party blowers, goody bags, invitations/ thank- yous, cupcake picks,  ribbon, store bought serving products, tablecloth,  and curly ribbon streamers.
This is an adorably unique ensemble that will work great for any young child's birthday, and/ or a baby shower. I used the Stampin' Up! set FOX & FRIENDS. I used So Saffron, Bashful Blue, and Rose Red for the colors. I found plates, napkins, flateware, and cups to coordinate at a local store.

*hint: because these stamps are a solid image stamp, it is best to use permanent ink such as chalk ink. stazon/ or pigment ink. I used chalk inks to get a crisp/ clean image.

Here is a close- up of the party hats. I found a pattern via internet and traced, cut, and assembled. I added paper strips with a hot glue gun and curled the strips with a bone folder. I think they are adorable. In this picture you can also see the mini cards that can be used for invitations/ thank- yous.


In this photo you can see more of the mini cards plus the goody bags (under the party blowers), and the party blowers. Aren't they cute?


Here is a close-up of the cupcake picks and the birthday boy/ girl's ribbon. This kit is sold with a box of confetti cupcake mix (makes 12 cupcakes). The picks will work perfectly to further decorate each yummy treat.

7/27/10

Tropical Luau Ensemble

All materials are Stampin' Up!
Finally got around to posting some pictures of some projects I made at my last Open House at the end of June. The ladies made the tag and the small take-out style box. I added the adorable coconut drink vessel and the card to make the ensemble complete.
MOST MATERIALS USED FROM SUMMER MINI CATALOG: Island Floral Bigz Die #118871, Island Oasis Party Favor Boxes #117178, Island Oasis Designer Series Paper #117173, Tropical Party Cear stamps #120081, Scallop Circle Punch #119854, Rhinestone Brads (Square Ice) #109113
(sorry cannot adjust this picture size)
Once flowers/ leaves were cut on the Sizzix machine,  I distressed/ shadowed the edges with classic ink in the same color (rose red/olive green)  I then used a bone folding tool to curl the petals.  I threaded string through the small button, tied in a knot,  and attatched button to the center with a glue dot. I fell in love with this line of products once I saw them in the catalog.  They are so bright, happy, and cheerful.


7/26/10

DISTRESSED SHADOWBOX WITH TIM HOLTZ

Ok, if you follow my blog you know that I met one of my favorite stamp artists back in April. I posted this picture back then but, had not got around to posting the picture of what I did with the photo. I decided to make a distressed shadow box. I coordinated the paper with both Tim's and my shirt.
I came across the shadow frame clearanced in a large chain store. I could not pass up the deal- 80% off.  It was already distressed to the extent that I wanted so I did not do anymore with it. It was perfect!
Here's a close up picture of the tag (sorry for the glare). I added pearl-like embellishments (misc.) to coordinate with the pearls I was wearing (my great-grandmother's). I added SU! polka dot ribbon (Bermuda Bay- retired) to the tag (size #8 tag). I added further metal embellishments from Tim's line (of course, could not use anythign else). I distressed with SU! Soft Suede classic ink and sponge dauber.  
I am so happy with the way it turned out... LOVE IT!!!! My husband doesn't understand it.

7/25/10

GOODY BAG TAGS

My youngest turned 9 this week. We had a small birthday party during the day because of our hectic softball schedules. Thank goodness the season is almost over.
Here is a picture of the goody bags I made up for the girls. I found these clear, snap closure bags a while back and decided to use them for take- home bags for the girls. I stamped a tag for each bag coordinated by color. Embossed texture using Sizzix Big Shot machine and plates.Filled each with stamps, ink spots, beads, bath gel, picture frames, and candy. Used a retired SU! set named  ALPHABITS and retired  1/4" square punch to label each tag with their names. Tied each tag on with retired SU! rainbow sheer ribbon. Colored each tag with COPICS and viola!
The girls just loved how they truned out! They couldn't wait to use the bags for their makeup and nail polish. They are going to use the tags on their overnight/ book bags.

7/6/10

CELEBRATE FREEDOM

Playing around with some non SU! stamps. Isn't she cute? Couldn't resist this one. Colored with Copics. Punched 3 different size and shaped stars and attached at various heights using dimensionals. Added small brads, star brads, and button in center of each star for more depth and texture. Used up some retired SU! (Ballet Blue) cardstock and some old (misc.) patriotic striped designer paper. I only had a 1/2 sheet of DS paper  (I got 12- 1" strips to make 12 of these cards). I thought it was a clever way to use a splash of  busy patterned paper that was sitting in my stash for many years. I whipped these up in no time at all. I like to make quick- "no frills"- cards these days.
 
I always decorate my hutch in my kitchen with various dishes and items that coordinate with the season, Holiday, or time of year. I have recently started to collect antique milk glass (white- from various makers). I like to coordinate these items with new and festive pieces to give an eclectic look. Here's what I did for INDEPENDENCE DAY. I like how it turned out.

7/5/10

COURAGE

Here is the card I made for a local wounded soldier (link for info regarding the soldier on June 30th post). I used  the SU! COURAGE set #115330 from pg 49 in the new catalog.  I borrowed this from my aunt (thanks Crystal). What a beautiful stamp! I really like the stippled/ collaged image, it is different than something I usually purchase. I may have to add this to my wishlist ( which is a mile long since the new catty release).
 I distressed the edges by tearing and inking with the new Crumb Cake Classic ink # 121030 color using an ink dauber #102892 from pg 195 in new catalog. I used a color combination found from the new Color Caoch #121620 on pg 165- Not Quite Navy, Red Ridinghood Red, and Crumb Cake. The Color Coach is a "MUST- HAVE" from the new catalog. I used color pencil to add further color and mounted onto cardstock with dimensionals #104430 on pg 197.
I hope everyone enjoyed their  Holiday weekend, and spent many wonderful hours with family/ friends. Thanks for stopping by.