I made a couple Father's Day cards (one for the hubby and one for my dad) with inspiration from a card found here.
Now, I do not claim to be a professional "Altered Grunge Artist" but I put together a mini tutorial in distressing Manila paper tags using his inks and techniques.
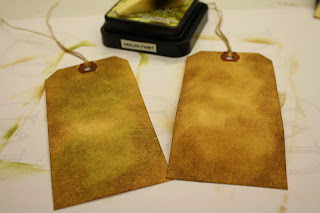
Ok, lets get started. I used 4 3/4 " x 2 3/8" Avery Reinforced Hole Shipping Tags (Office supply store) because this size tag fits perfect on the front of a 4 1/4" x 5 1/2" card front. Using Old Paper Distress ink and a foam makeup sponge (Dollar Store) I rubbed and dabbed ink all over tag front to get the desired affect I wanted(tag on left). (The photo above shows the tag before and after ink applied.)
Using the same sponge, I then applied Brushed Corduroy on top until I reached the desired affect (tag on right).*Note- the key to distressing and altering is layering the inks to get the affect you love.
No, I did not finish there. I then added Peeled Paint on top to accent the lighter areas (tag on left). If you apply the inks one right after the other, the inks blend perfectly. This ink is perfect for doing this technique. 

To finish the cards I attached some distress paper (map design) to the front of a black card base. I attached the tags towards the left of the card front. I put a Journaling Ticket on each tag and distressed with Weathered Wood. I stamped a couple images from the clear set (subway ticket, arrow, and clock) using Black Soot. I added some black patterned Washi Tape near the bottom of the cards overlapping them in an x pattern. I stamped the old car onto another tag and cut them out. I distressed the car image piece with Brushed Corduroy. I attached the cars with foam tape. I pierced a hole near the center of the clock image and placed a game spinner. I then finished the card by adding a piece of the acetate film strip tape with the Paper Attacher. I love the final product!!! I hope the important guys in my life are impressed.


No comments:
Post a Comment