6/23/12

DESSERT TABLE

I made 75+ cupcake toppers using decorative stickers and bright papers (music notes, monograms, and bees) per client request. She wanted to incorporate her high school mascot plus some of her high school interests onto the toppers. The small cake was baked by a local bakery then I made the monogram topper using tissue to make the ruffle, stickles to add dimensional polka dots in coordinating bright colors.

Congratulations Morganne! Best of luck to you. Kentucky bound...

6/16/12

WE'RE HAVING A PARTY, EVERYBODY'S SWINGING

Tomorrow my oldest daughter turns 18! We had a family and friend celebration last night at the house. She wanted something a little low key- to roast hotdogs and make camper pie pizzas. Being the crafty mom that I am... I went ahead and took it upon my self to make more food, cupcakes, and decorate for the event.

I set up the food buffet on my kitchen island using a mixture of plastic and glass black, white, and hot pink serving ware. Of course, this all matched the hanging pom poms, streamers, and balloons that decorated the ceiling above the island.

She really digs zebra print and we combined hot pink and regular zebra. I love the way it turned out. My youngest  and I made the adorable scalloped circle cup cake toppers. I use my cupcake tree all the time and this time was not acception.

I found adorable zebra boxes in the $1 spot at Target. I filled them with hot pink tissue and plastic flatware. I decorated my punch server with Stampin' Up!s vinyl flowers a couple years ago and it ended up matching perfectly.

The gift table was simple. Streamers , balloons, and candy was all it needed.


I made these adorable mini milk cartons using Stampin' Up! papers, inks, punches, and die cut. I will give a tutorial on these in my next post. I need to get ready to go to graduation party. I'm decorating the cake/ dessert table. I will post photos of that too. In the meantime, if you or you know of someone who likes the look of unique customized party supplies add affordable prices please pass on my name and blog information along to them. I 'm starting to do party decor on the side and really need the word to pass along. Thanks for stopping by.

6/14/12

Distressed Father's Day Card

I have one cabinet in my craft room dedicated to T!m Holtz and his products. I store books, DVDs, inks, refills, Perfect Pearls, Grunge paper,  die cuts, etc... in this small 'jam- packed ' cabinet. Although the "altered" style is not my everyday style, I LOVE to play with his products and experiment. I always make  masculine cards with these products and in this style. My husband thinks the finished products are "cool".
I made a couple Father's Day cards (one for the hubby and one for my dad) with inspiration from a card found  here.
Now, I do not claim to be a professional "Altered Grunge Artist" but I  put together a mini tutorial in distressing Manila paper tags using his inks and techniques.

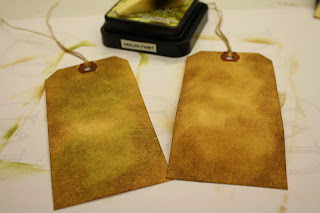
Ok, lets get started. I used 4 3/4 " x 2 3/8" Avery Reinforced Hole Shipping Tags (Office supply store) because this size tag fits perfect on the front of a 4 1/4" x 5 1/2" card front. Using Old Paper Distress ink and a foam makeup sponge (Dollar Store) I rubbed and dabbed ink all over tag front to get the desired affect I wanted(tag on left). (The photo above shows the tag before and after ink applied.)

Using the same sponge, I then applied Brushed Corduroy on top until I reached the desired affect (tag on right).*Note- the key to distressing and altering is layering the inks to get the affect you love.

No, I did not finish there. I then added Peeled Paint on top to accent the lighter areas (tag on left). If you apply the inks one right after the other, the inks blend perfectly. This ink is perfect for doing this technique.
To finish the cards I attached some distress paper (map design) to the front of a black card base. I attached the tags towards the left of the card front. I put a Journaling Ticket on each tag and distressed with Weathered Wood. I stamped a couple images from the clear set  (subway ticket, arrow, and clock) using Black Soot. I added some black patterned Washi Tape near the bottom of the cards overlapping them in an x pattern. I stamped the old car onto another tag and cut them out. I distressed the car image piece with Brushed Corduroy. I attached the cars with foam tape. I  pierced a hole near the center of the clock image and placed a game spinner. I then finished the card by adding a piece of the acetate film strip tape with the Paper Attacher.   I love the final product!!! I hope the important guys in my life are impressed.  

STAMPIN' UP! STAMPS FOR SALE


Since the release of the new catalog I decided to sell some of my older and retired stamp sets. They are all $5 (large or small sets). Most are lightly used ( one or two stamps in the set were used) but some were never used. All sets marked with * are NEW. All are wood mounted sets. Most are already mounted some of the new sets are not mounted but are die cut and ready to be mounted. If you are interested in purchasing I will ship to you using FIRST CLASS starting at  $3.00 shipping costs. Priority Mail USPS (may be cheaper for more than one set) starting at $12.00. Of course, combined purchases/ shipping can be at a discounted rate. I will fulfill on a first come first serve basis.

*Flower Lines (4) SOLD
Bitty Basics (10)
*Mostly Flowers (4)
The Art Of Life (4) SOLD
Nursery Necessities (12) SOLD
*Three Little Words (8) SOLD
*Fast and Fabulous (6)
Love You Much (6)
*Live Like You Mean It (7)
*Comfort Food (4)SOLD
Send A Celebration (4)
Garden Collage (3)SOLD
Branch Out (7)  SOLD
Close To Nature (4)
Warm Words 1&  2 (combined) (11)
*Fall Flair (8)
*Of The Earth (4) SOLD
Friendships Journey (4)SOLD
*Perfect Petals (4) SOLD
Happy Harmony (6) SOLD
*Measure Of A Life (5) SOLD
Best Of Cluck (7) SOLD
Provencal (4)
Zoofari (6)
Doodle This (5)
Seeing Spots (6)
Short and Sweet (12)
*Hodgepodge Happiness (5)
Tart & Tangy (4)
Aways (11)
Priceless (11)
Baroque Motifs (6)SOLD
*Cheep Talk (11)
*Wishing You The Best (4)
*Organic Grace (4)
*Spring Solitude (6)
*Botanical Blooms (7)
Delight In Life (6)
Dare To Be Darling (4)
Sweet & Sassy (8)
*Picture This (7) one missing
*So Very (8)
*On The Move (4)
*Sidekick Saying (3)
*Trendy Trees (8)
*Forest Friends (4)
Loads Of Love (7)
Loads Of Love Accessories (12)
Curvy Verses (8)
*Eastern Blooms (5)
*Friends Rock (6) SOLD
*Pocket Full of Posies (4)
*Made from Scratch (4)
*Doodle That (4)


6/12/12

CAKE STAND MANIA

Wow... cake stands are so popular! You can find them everywhere! In stores, on the Internet, in craft and home decor magazines and even in the grocery store. I love, love, love them. There are many styles and sizes. And... even better... they can be really simple and inexpensive to make. They make great gifts, look great on dinner or dessert buffets, and also look great in your guest restroom holding towels or soaps. They really are my new favorite craft and gift to give.
Here are a couple of my favorite cake stands that I 've come across through Internet browsing:

stenciled  wood plaque cake stand

Colorful recycled object cake stands

Painted recycled glassware cake stands

cut wood cake stand

Blue plywood and dollhouse trim cake stand


Now here is a quick tutorial on how to make a couple kinds of cake stands for under $5:
#1
Supplies:
E6000 adhesive
1 plate (used, new)
1 candlestick (used, new)

*THE TOTAL COST FOR EACH OF THESE CAKE STANDS IS $2*
I found these glass plates and candle holders at THE DOLLAR TREE each piece for $1. 
 Here is how to make one:
Wash, remove all stickers or price tags,  and dry both glass pieces. Turn plate upside down and find center. Add adhesive (E6000) to top of candlestick edge and place to center of bottom of plate. Add weight to base and let set for 4+ hrs. VIOLA!

 I added swirl design to the second cake stand using silver and gold Sharpie markers on the underside of the plate and candle stick base. You can put in oven at 200- 250 degrees F for 2 hrs for marker to set permanently. Its recommended to do outside or underside so the cake stand is food safe. You could take things a little further and spray paint the clear glass candle stick to coordinate with the top plate.  Only paint areas that will not touch food. Spray paint is not food safe. Hand washing your cake stand is highly recommended.

As I mentioned before, I love to make these! I think they look great to serve  cake, muffins, cupcakes, etc on. You can make them various heights, colors to use on the same buffet. I love the mixture of bright summer colors. Since they are so cheap to make you can make many colors to match various decor, dishes, or Holiday decor. We are getting ready for a few birthday parties in the next few weeks. Stay tuned to see how I use them.


Ok, here is another kind that I made. The one  in the photos uses a luncheon/ salad plate and a bowl. I found these at BIG LOTS  for $2 each. Using the E6000 adhesive, I  attached the bowl to the bottom of the plate and let set 4+ hrs. You could alter this design and use a large plate or a platter on a bowl base. I made a ton of these for Christmas gifts. I made  bead and wire wrapped spreaders or serving flateware to use with the pedestal stand. Everyone loved it!

Here is a salad bowl set I made for my mom. I found this awesome bamboo salad bowl at Target. I bought some simple serving ware and wrapped with coordinating wood and natural stone beads. The bowl is mounted on short silver colored base. The possibilities are endless! Jump on the cake stand/ pedestal Bandwagon like I did. Its quick, simple, and fun.